

It's normal to feel nervous about giving yourself an injection. The good news: the needles used for semaglutide and tirzepatide are very small (finer than a flu shot), the technique is simple, and most patients report the second injection feeling like a non-event. This guide walks through both the brand-name pen approach (Wegovy®, Ozempic®) and the compounded vial approach, plus the fundamentals that apply either way.
Which form are you using?
| Form factor | What you have | Typical source |
|---|---|---|
| Prefilled pen | A disposable pen with built-in dose selector | Brand-name Wegovy®, Ozempic®, Zepbound®, Mounjaro® |
| Vial + syringe | A small glass vial of medication and separate syringes | Compounded semaglutide or tirzepatide |
The technique for the actual injection is the same regardless. The preparation differs.
The fundamentals (applies to everything)
Where to inject
You have three accepted injection sites:
- Abdomen — at least 2 inches away from the navel. Most patients' preferred site because the area is easy to see and manipulate. It helps to stand up when injecting into the lower stomach area.
- Upper outer thigh — the upper, outer area of either thigh. This firmer area may make it easier to inject than the abdomen.
- Upper arm — the back of the upper arm. Harder to self-inject because of the angle; often a spouse or partner helps. Plenty of subcutaneous tissue.
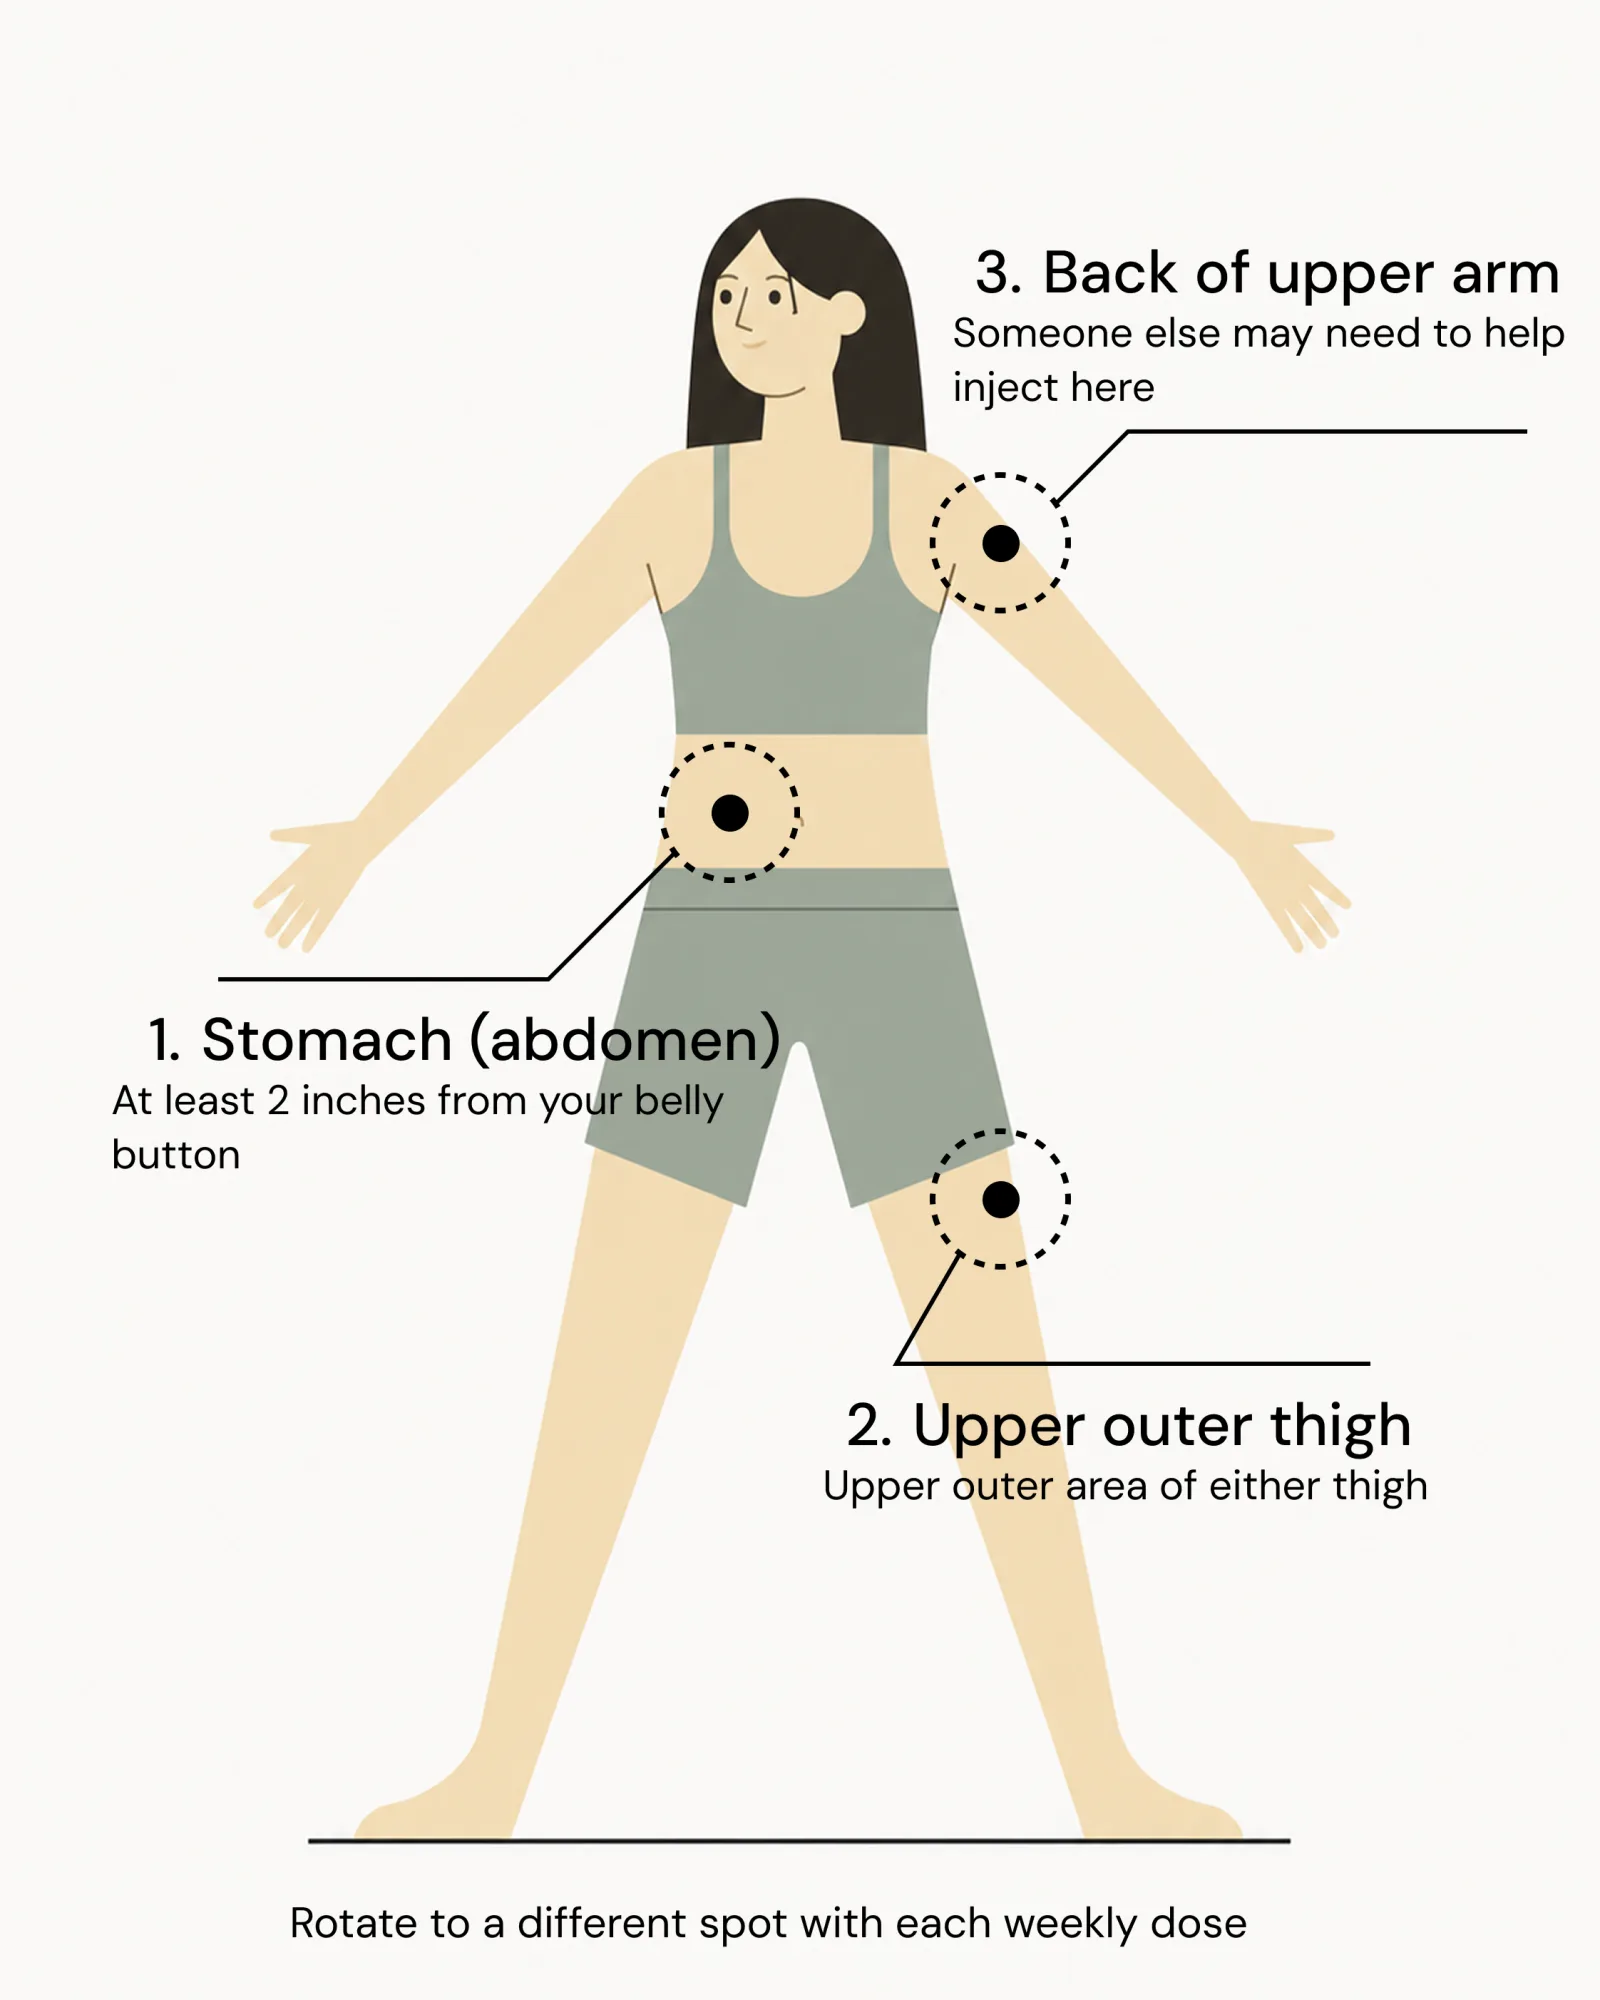
All three are equally effective. Absorption rate is similar across sites. Pick whatever is comfortable.
Rotate your sites
Injecting in the exact same spot every week eventually causes minor scar tissue buildup (lipohypertrophy) which can affect how the medication absorbs. Rotate among the three sites or among positions within one site.
A simple pattern: week 1 left abdomen, week 2 right abdomen, week 3 left thigh, week 4 right thigh, week 5 left abdomen again. Mark it on a calendar for the first couple months until it becomes habit.
Let the medication reach room temp
Cold injections sting more. If your medication is stored in the refrigerator, take it out 15–30 minutes before injecting and let it come to room temperature. Don't microwave, don't run under hot water, don't place in direct sunlight — just leave it on the counter.
Clean the site
Wipe the injection site with an alcohol pad. Let it air dry for 15–30 seconds before injecting — injecting through wet alcohol stings significantly more. Avoid touching the area after cleaning.
Needle angle
All GLP-1 injections are subcutaneous, meaning the medication is injected under the skin. The angle of the injection depends on the specific drug and form. Always check your prescriber's guidance, but in general:
- For prefilled pens, the needle goes in at 90 degrees — straight in, perpendicular to the skin.
- For syringes, a 45-degree angle with a slightly pinched skin fold is sometimes used.
If you have a prefilled pen (Wegovy®, Ozempic®, Zepbound®, Mounjaro®)
Step 1: Attach the needle (if applicable)
Some pens come with a stack of disposable needle tips; sometimes they're sold separately (or built into the device). Remove the outer cap, twist a new needle onto the pen until it's snug, then pull off the needle's outer and inner caps.
Step 2: Check the dose
Always check the product label to make sure it matches your prescribed medication and dose. For multi-dose pens, turn the dose selector to set your prescribed dose. Look at the display window to confirm.
Step 3: Prime (check) the pen (if necessary)
Some pens (but not single-dose Wegovy® pens) require a priming step where you hold the pen needle-up and press the button to check flow. Check your pen's instruction leaflet.
Step 4: Inject
- Prep the injection site
- Insert the needle straight in (90-degree angle for pens, 45-degree angle for syringes)
- Press and hold the dose button firmly until the full dose is delivered (usually takes 5–10 seconds)
- Pull the needle out straight
Step 5: Dispose
A single-use pen goes right into a sharps container. For multi-use pens, put the needle cap back on (carefully), unscrew the needle, drop it in a sharps container. Do NOT reuse needles. Do NOT throw them in regular trash.
If you have a vial + syringe
First, understand units vs. milligrams (mg)
This is the single most common point of confusion for new vial patients. Your prescription states your dose in milligrams (for example, 0.25 mg once weekly), but the insulin syringe in your kit is marked in units. And, since you are using this syringe to inject semaglutide (not insulin), the unit markings measure liquid volume, not medication strength. How many units equals your dose depends entirely on the concentration printed on your vial's label (mg per mL), which varies between pharmacies. That's because compounded semaglutide concentrations can differ.
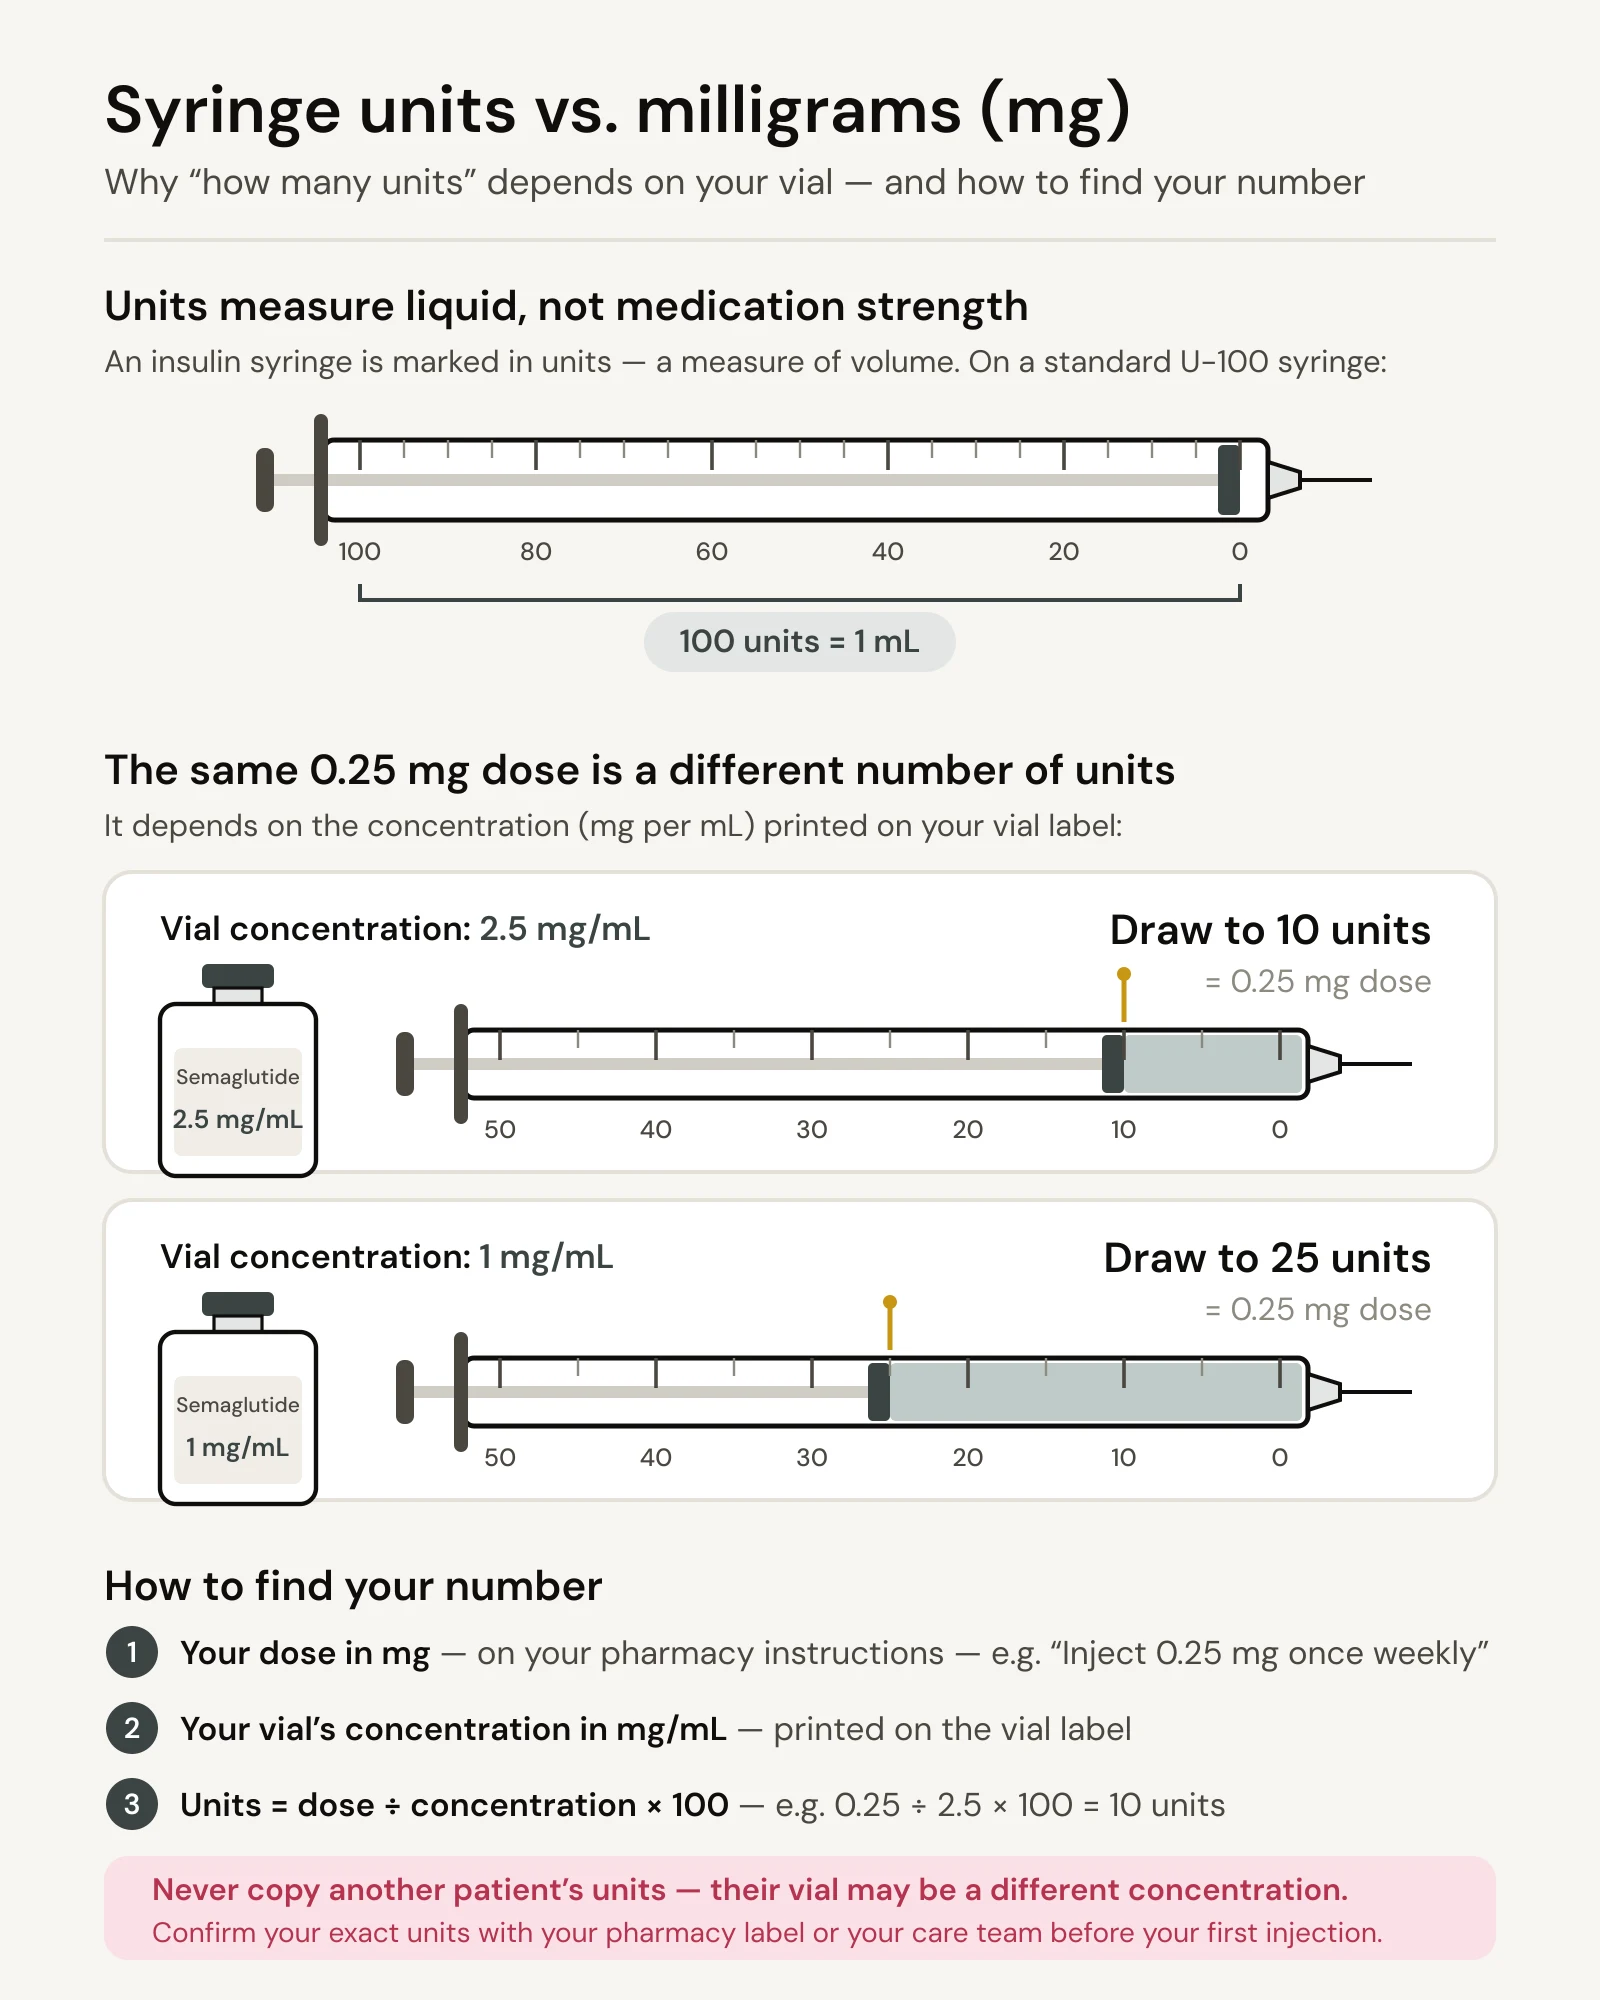
Your pharmacy instructions will state the exact number of units to inject — follow that number, and if it's missing or unclear, message your care team before injecting. Never go by the number of units another patient uses: their vial may be a different concentration, so their number may be wrong for you.
Step 1: Gather supplies
- Medication vial
- Syringe (usually a 1-mL insulin syringe with an attached needle)
- Alcohol pads
- Sharps container
Step 2: Wipe the vial stopper
Clean the rubber stopper on top of the vial with an alcohol pad. Let it dry.
Step 3: Draw air into the syringe
Pull back the plunger to the dose your pharmacy instructions specify — stated in units on the syringe's scale (for example, "draw to 10 units"). This introduces air into the syringe equal to the dose you'll draw out.
Step 4: Insert into the vial and inject air
Push the needle into the vial through the stopper. Push the plunger to inject the air into the vial. This equalizes pressure so you can draw medication out easily.
Step 5: Invert and draw medication
Turn the vial upside down (needle pointing up now) and keep the needle tip submerged in the liquid. Slowly pull the plunger back until the syringe contains a little more than your prescribed dose.
Step 6: Remove air bubbles
Tap the side of the syringe gently — any air bubbles will rise to the top (toward the needle). Push the plunger slightly to expel the air and bring the plunger back down to exactly your target dose.
Step 7: Remove from vial
Pull the needle out of the vial.
Step 8: Inject
- Pinch the skin if your provider says
- Insert the needle into your skin at the angle your provider showed you — usually 45 degrees for syringe
- Slowly push the plunger all the way down
- Count to 3–5 after the plunger is fully down
- Pull straight out
- Release the skin
Step 9: Dispose
Do NOT recap the needle — that's how needle sticks happen. Drop the whole syringe into a sharps container immediately.
Common first-timer questions
Does it hurt?
The needles used for GLP-1 injections are very thin (typically 29–32 gauge). Most patients report either no sensation or a very brief pinprick. If it hurts more than expected:
- Cold medication → let it sit at room temp first next time
- Wet alcohol pad → let skin air dry fully next time
- Tensing up → relax the injection area
- Dull needle (shouldn't happen if you're using a fresh one) → use a new needle every time
Do I need to pinch the skin?
For most people using prefilled syringes, yes — it creates a defined target and makes the injection feel less ambiguous. For very muscular areas, gently pinching the skin may be especially helpful to ensure the injection lands in subcutaneous tissue (fat layer) rather than muscle. For patients with more body fat, it's not strictly necessary but your provider can let you know what's recommended depending on the semaglutide product you're using. Pinching is not usually necessary for anyone using the autoinjector pens.
What if I inject in the wrong spot?
If you inject into muscle instead of fat, the medication still works but may be absorbed slightly differently. Not dangerous; just not ideal. Pinching the skin may reduce this risk for some people.
What if I see blood?
Very common and not a problem. Small capillaries are throughout the subcutaneous tissue. If there's a tiny dot of blood or mild bruising, it means you hit one of them. Apply gentle pressure for 10–15 seconds. Don't rub the area.
Can my spouse/partner inject it for me?
Absolutely. Many patients prefer this. If injecting in the back of the upper arm, it's significantly easier with help.
What if I forget a weekly injection?
Guidance varies with the specific product. According to the labeling for Ozempic®, if you realize within 5 days: take the dose as soon as you remember, then resume your regular weekly schedule based on your new injection day. If more than 5 days have passed: skip the missed dose and return to your regular schedule. Don't double up.
Wegovy® labeling offers different guidance: if your next scheduled dose is more than 2 days away, take the missed dose as soon as you remember; if your next dose is less than 2 days away, skip the missed dose and resume your normal schedule. When in doubt, message your care team for guidance.
Storage
Before opening:
- Keep in the refrigerator (36–46°F / 2–8°C)
- Keep in the original carton to protect from light
After opening:
- Brand-name pens are generally stable at room temperature (up to 86°F / 30°C) for up to 28 or 56 days after opening, but check your specific medication's insert
- Compounded vials typically have a 28-day beyond-use date after opening at refrigerated temperatures; check the label for your specific pharmacy's guidance
- Never freeze. If your medication has frozen, discard it.
Traveling:
- Bring in carry-on (not checked luggage — extreme temperatures)
- TSA allows prescription medications
- For long trips, use an insulated bag with a small ice pack (not directly touching the medication)
Tips from experienced patients
These are patterns that come up repeatedly in patient feedback:
"Inject right before bed." Many patients find that if they inject in the evening, they sleep through some of the nausea window. Works especially well during titration weeks.
"Always inject on the same day." Your body adjusts to the dose-time pattern. Moving the injection around week-to-week can feel more jarring.
"Mark your injection day on a calendar." Set an alarm or use a medication reminder app to prevent forgetting your dose. Don't wait until your next dose is due to order your next refill.
"Keep extra needles on hand." For pen users, order extra pen needles — occasionally one will be slightly bent or hard to attach.
Bottom line: Rotate sites, store the medication at room temperature before injecting, and pinch the skin if your prescriber recommends it. The first injection is the hardest — by the third, most patients find the routine takes less than 90 seconds and feels easier than they expected.